


In this article, I’ll show you two examples of a customized WooCommerce new order email notification. One example will be for ShopMagic free users, while the second, slightly more complex, will require ShopMagic PRO and its add-ons. Grab a coffee (or any other preferable drink) and spare a few minutes for me 😀.
Is WooCommerce not sending the new order email or the email template is not enough for you?
Let’s use ShopMagic (email customizer plugin) to send a better new order email notification to your WooCommerce customer.
Table of contents
- What is ShopMagic and how does it work?
- Create WooCommerce new order email notification with ShopMagic free
- Additional options in ShopMagic PRO
- History & features of ShopMagic
- Summary & more about ShopMagic
What is ShopMagic and how does it work?
If you haven’t heard about our plugin, I’ll briefly explain what exactly is ShopMagic, because the marketing automation phrase does not fully define its capabilities.
👉 Have a look at this video, which shows you what the plugin does:
What’s more, you can download the plugin completely for free 😎.
ShopMagic
Not receiving WooCommerce new order emails? Go on and send WooCommerce new order emails to customers with ShopMagic.
Download for free or Go to WordPress.orgCreate WooCommerce new order email notification with ShopMagic free
-
Install and activate ShopMagic
Now, as you know that you can use ShopMagic not only to send WooCommerce new order emails, we can move to its installation. It’s a very quick and easy process. Take a look at this screenshot:
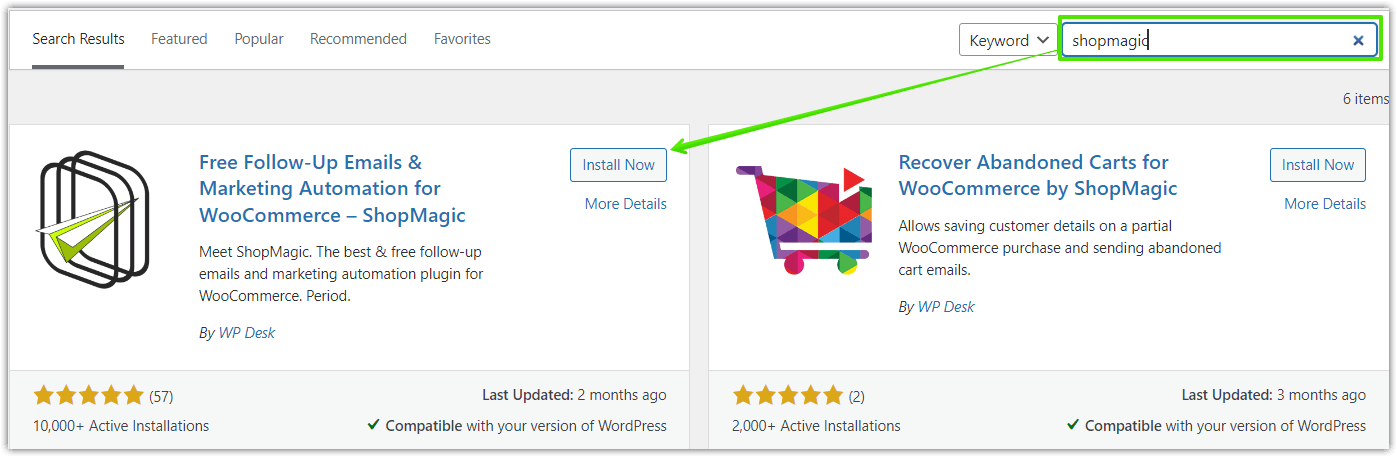
You can download ShopMagic from the WordPress.org website or install it directly through your plugins section in the admin’s dashboard.
👉 You can also download it directly from here:
WP DeskShopMagic
Not receiving WooCommerce new order emails? Go on and send WooCommerce new order emails to customers with ShopMagic.
Download for free or Go to WordPress.orgLast Updated: July 7, 2026🥳 Even the free version of ShopMagic will let you create better WooCommerce new order emails than a standard WooCommerce notification. -
Create automation for the new order email notification
Similar to installation, it is a very straightforward process.
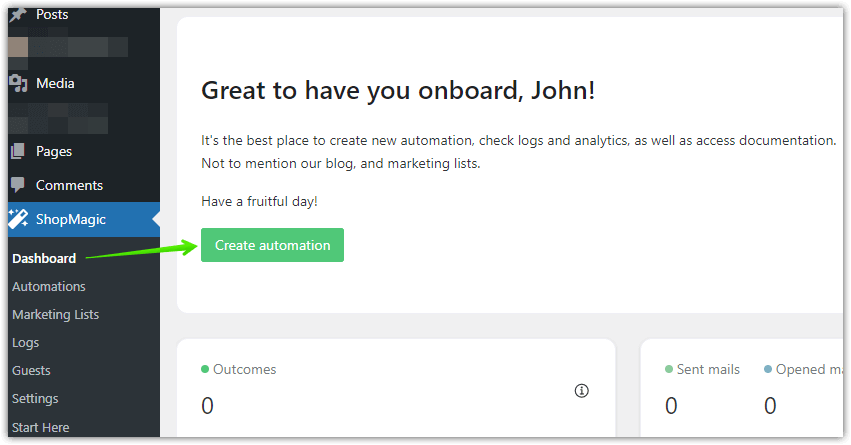
First, go to ShopMagic → Dashboard. Clicking on it will open a new window.
Then, click Create automation:
-
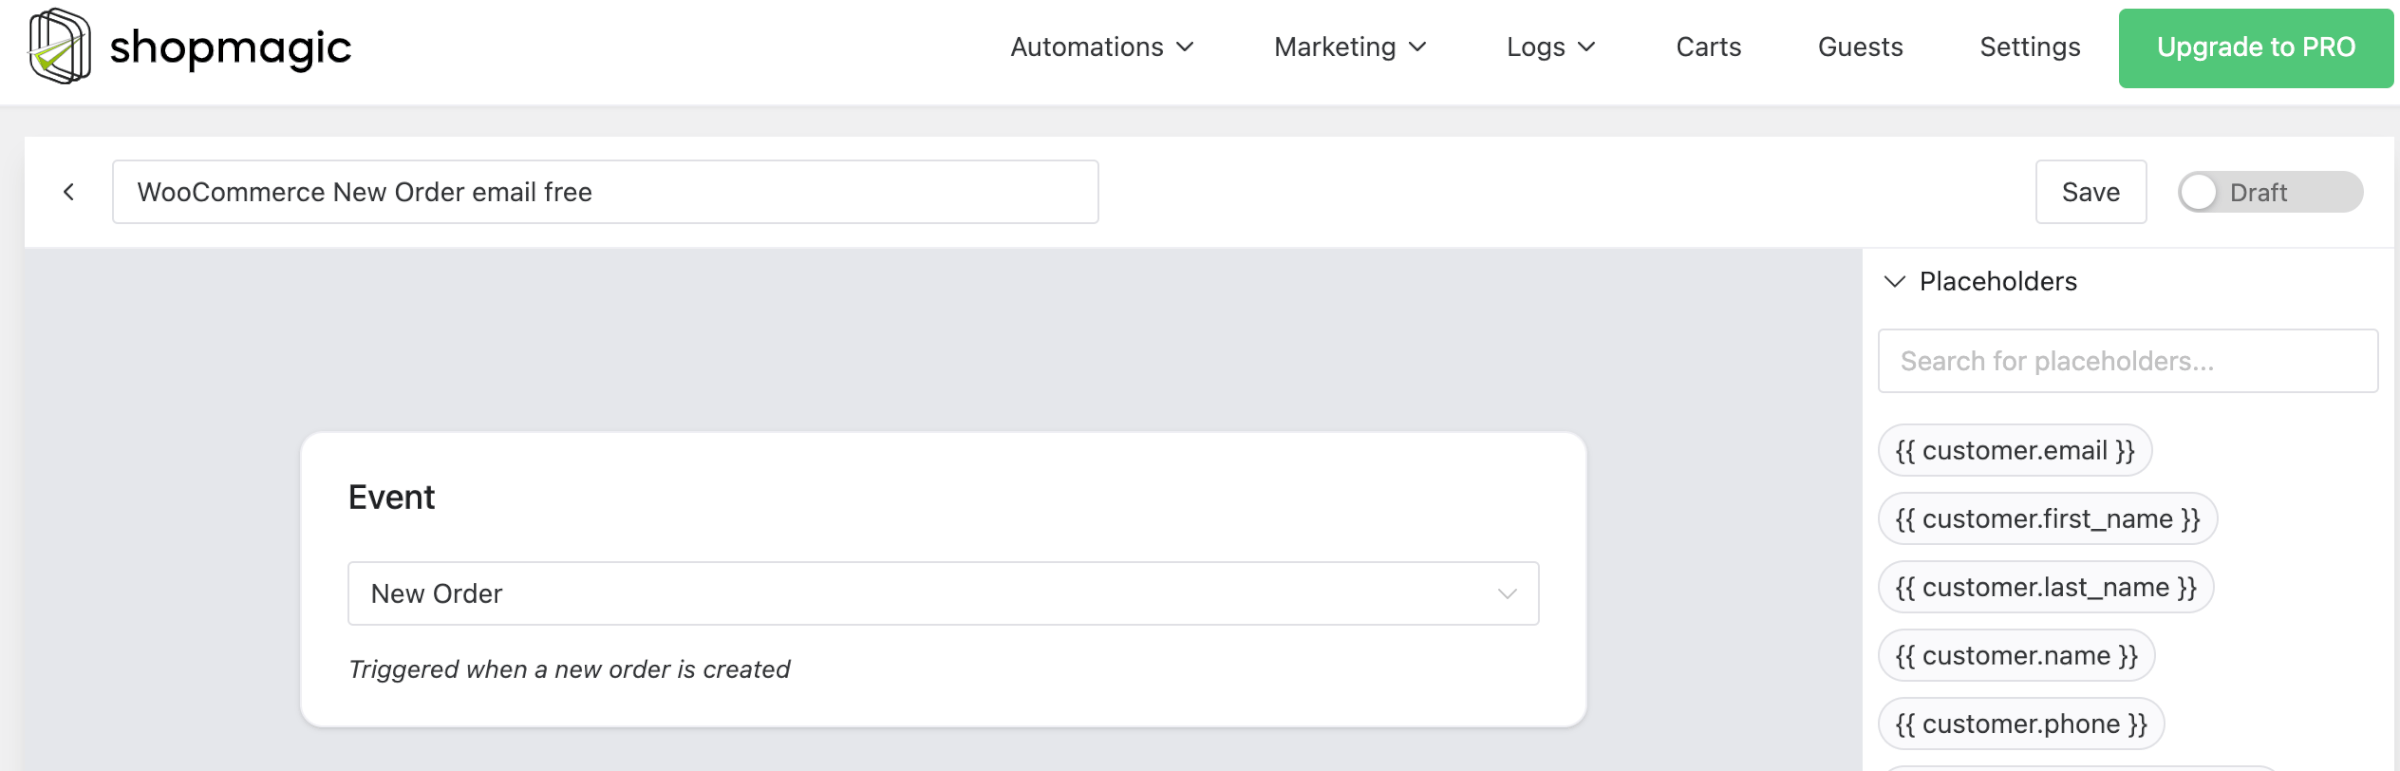
Choose Event (new order)
Now you can start creating your new order notification. You will be able to fill in the description and choose a proper Event.
You can describe your automation however you want, mine will be “WooCommerce new order email free”.
From the Event select New Order.
-
Setting up a Filter and Action for the WooCommerce new order emails
If you decide that you want to send different emails to customers who buy different products – use the Filter to precisely choose these products.
💡 For example, if you are running a pet store, you will be able to send different emails to cat and dog lovers. I think that they will appreciate it 😇.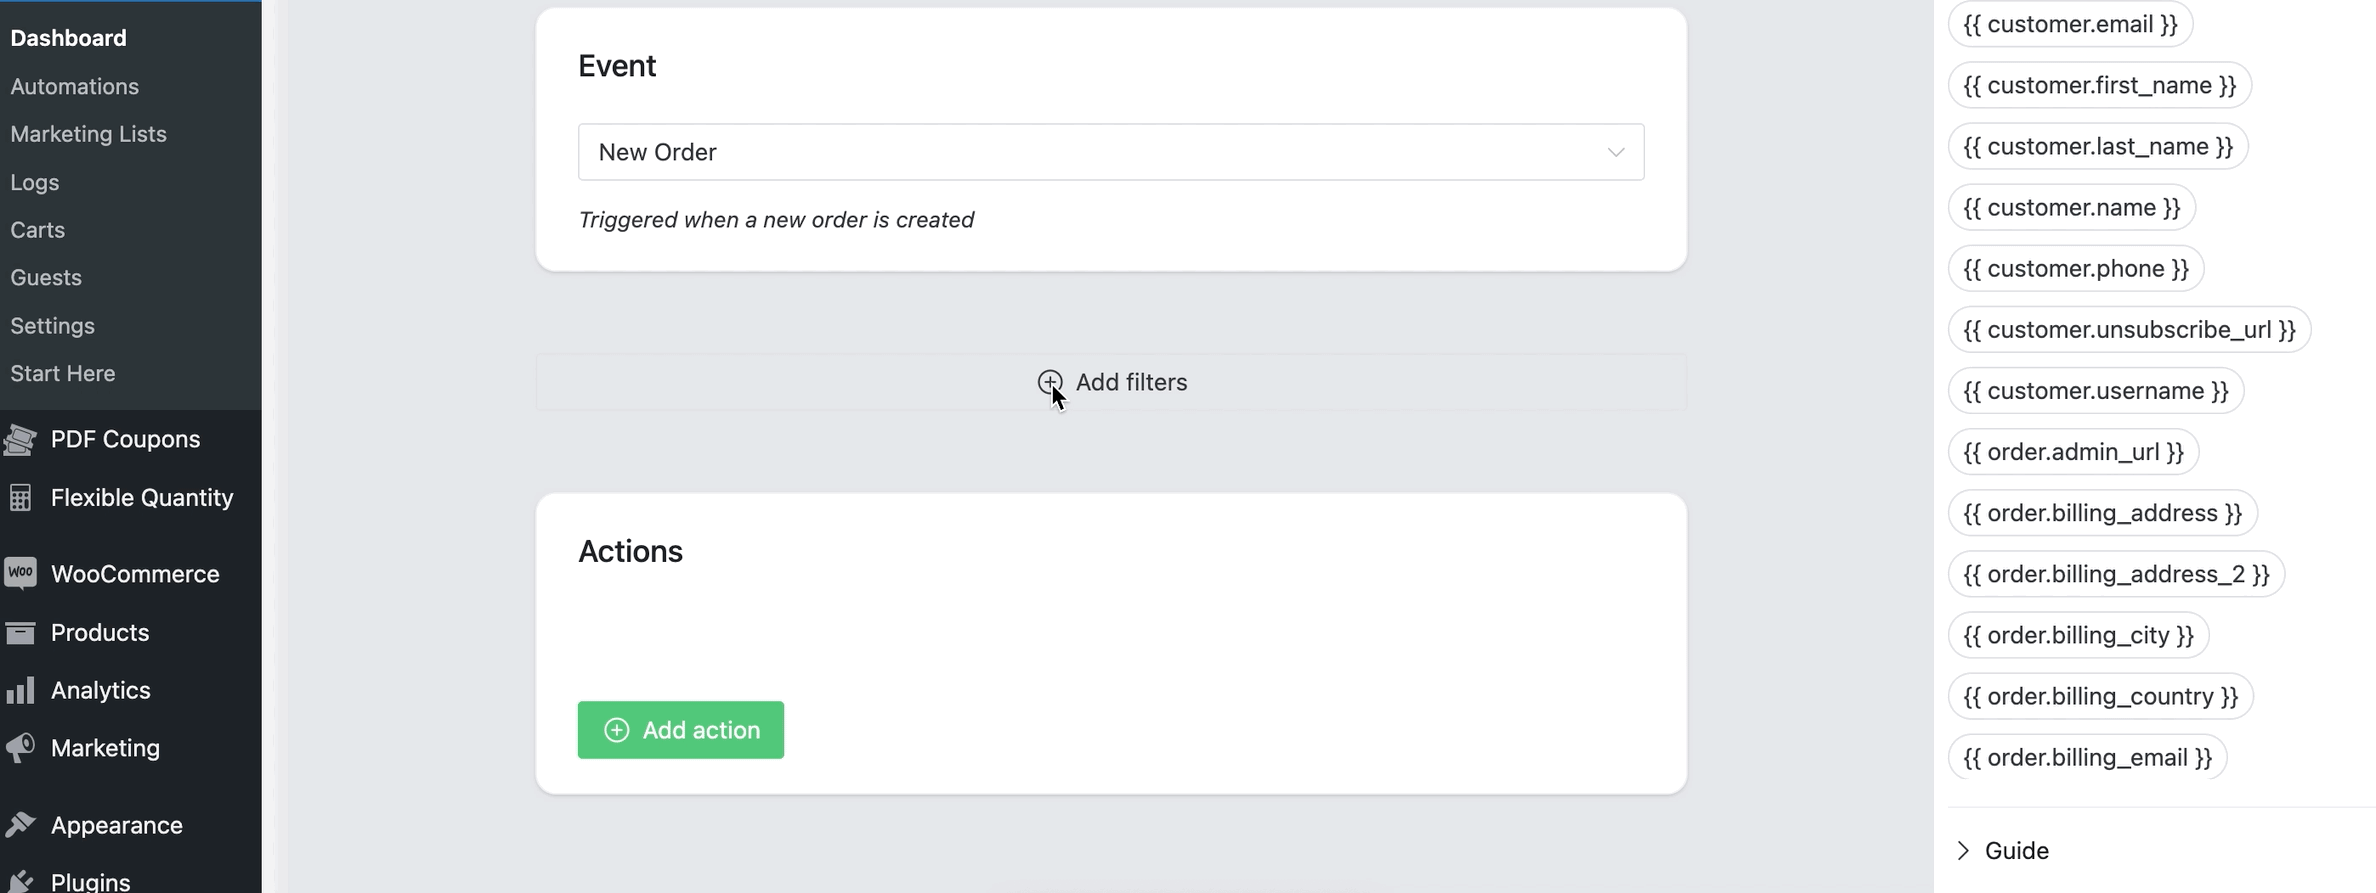
-
Use Action (send email)
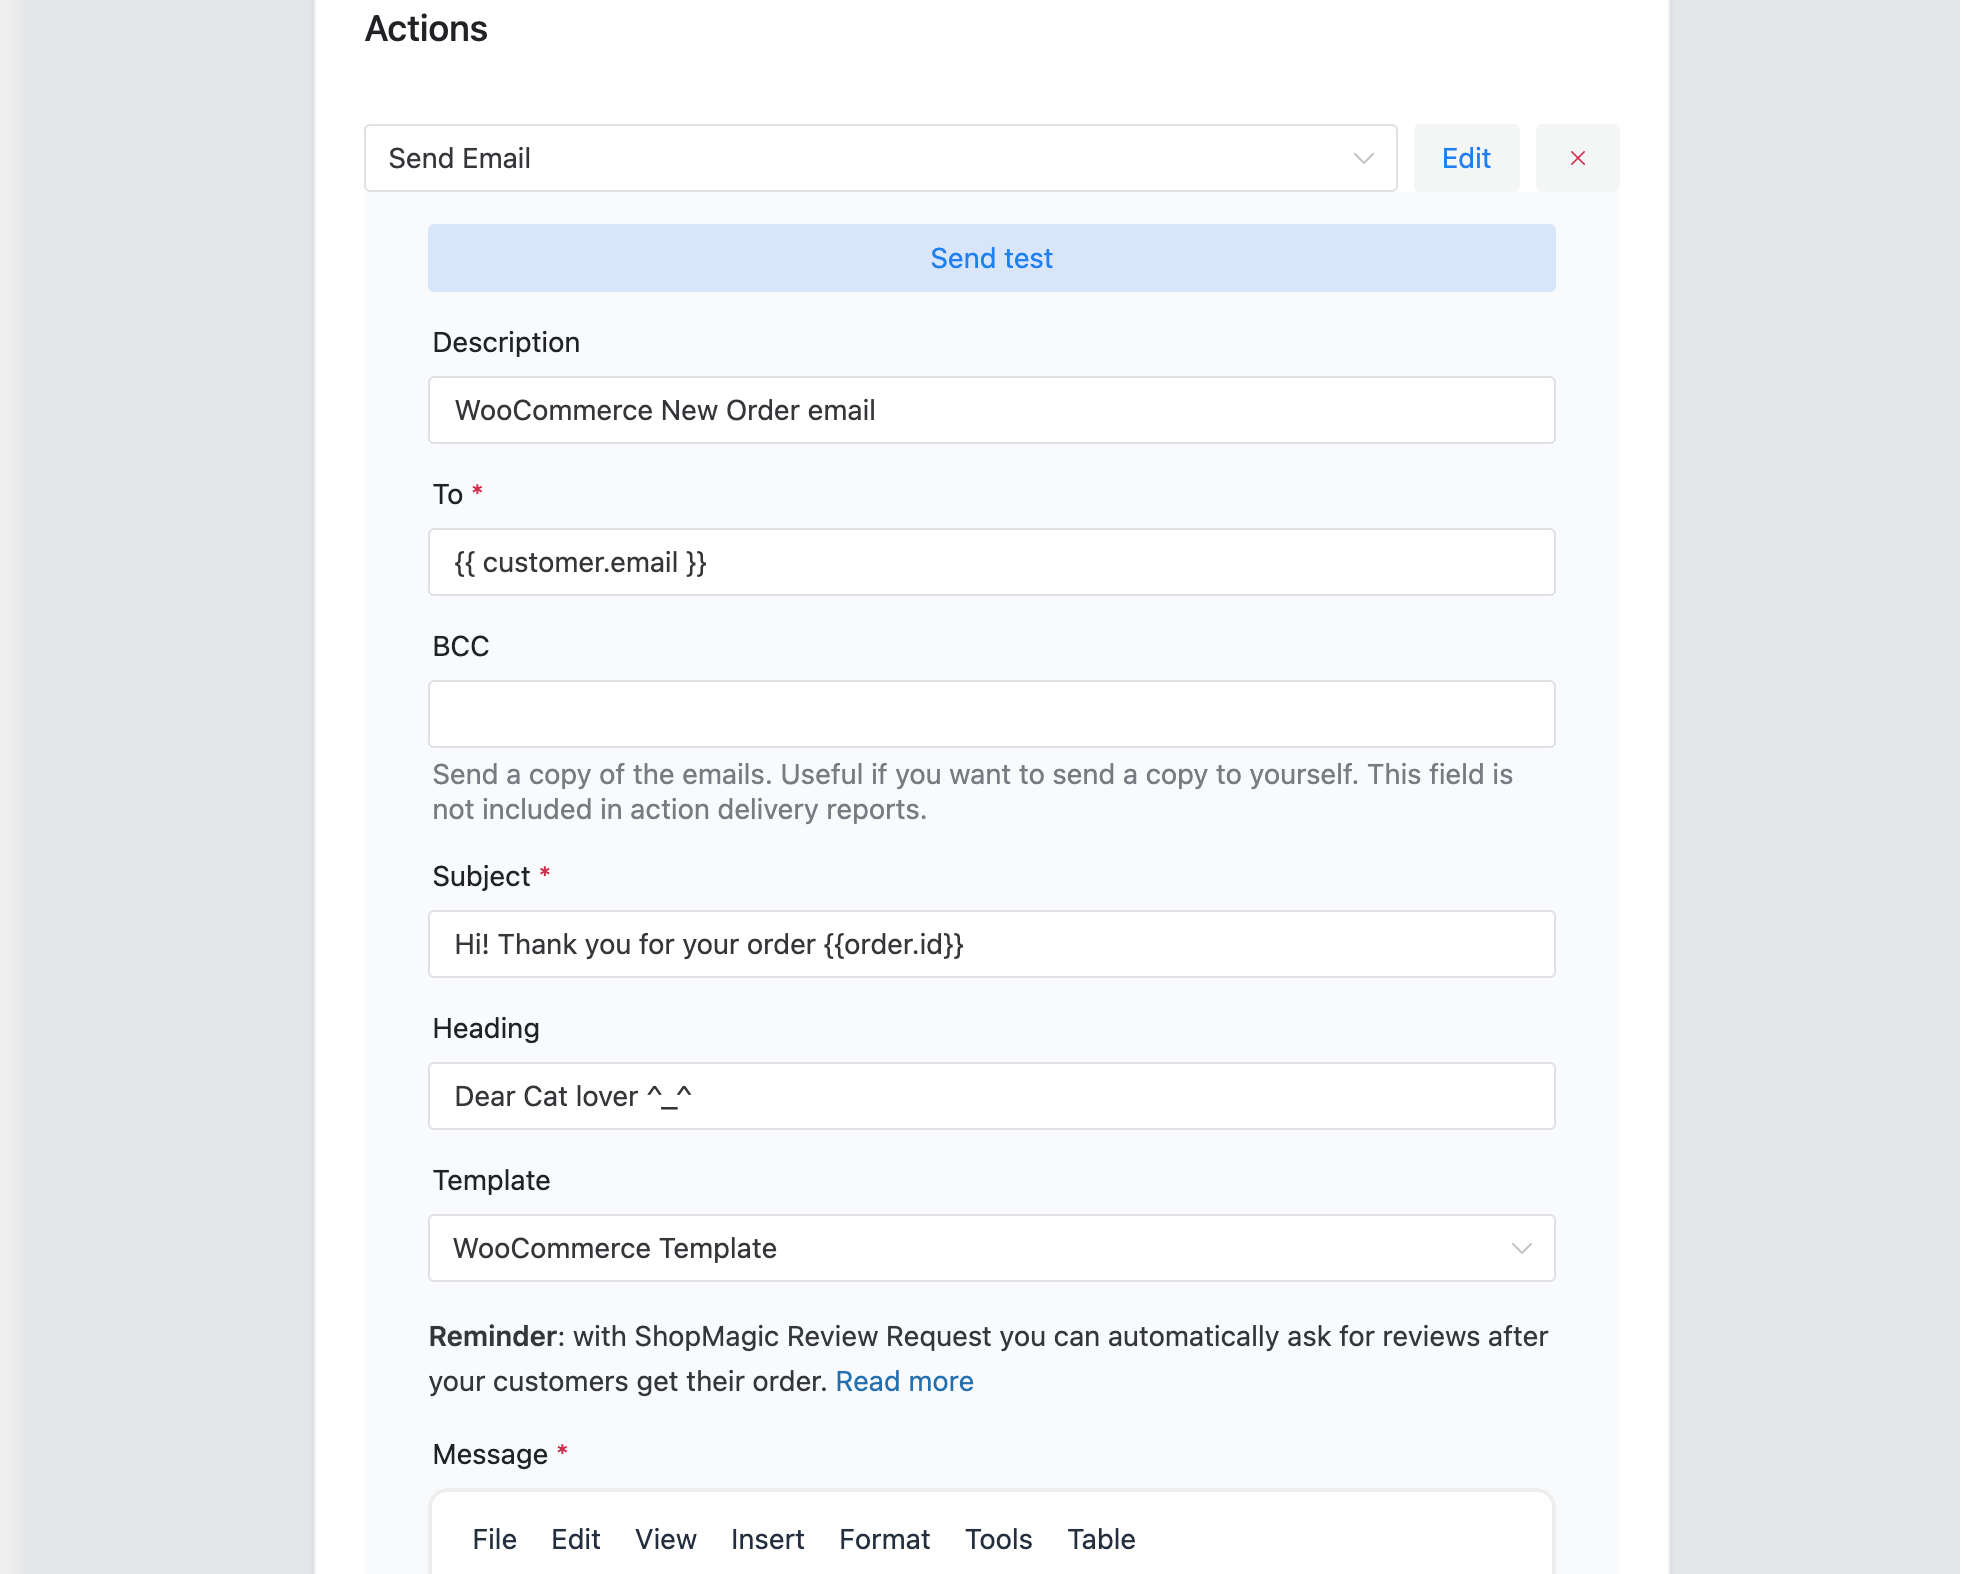
When it comes to the Action field, you will see a few fields to fill but most of them are very straightforward, look:
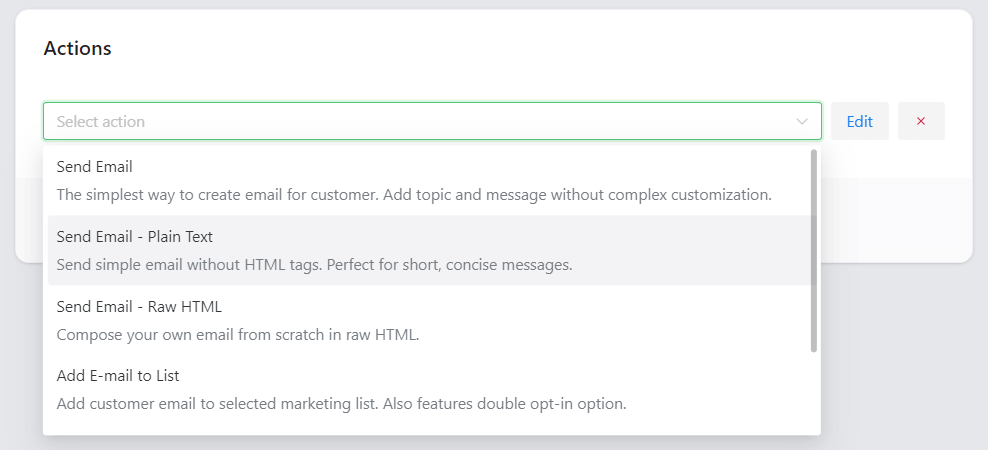
Starting from the top, select a type of action (Send email) then fill in the description field if you want. Field To is to add an email’s recipient and it’s prefilled with a handy placeholder
{ customer.email }.💡 HINT: Do you know that you can use your own HTML code? Instead of Send email click on Send email – Raw HTML.In the Subject and Heading, write a short and eye-catching message.
For the Template – I chose the WooCommerce template.
For longer communication, there’s a dedicated field called… Message. Here you can write detailed information to your customer. Of course, with the full support of available placeholders.
-
Test your new order email notification for WooCommerce
Curious about what your email will look like? ShopMagic is equipped with a useful solution.
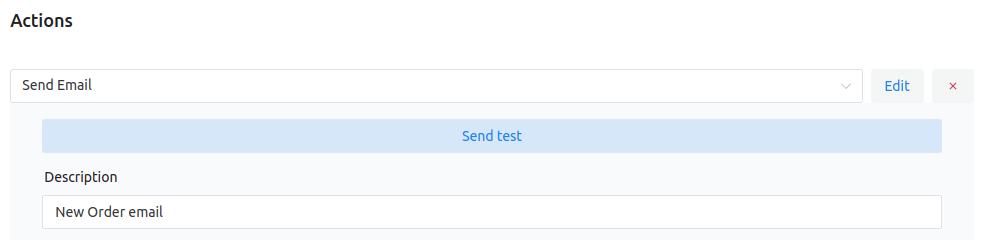
Click on Send test (which I marked on a screenshot) and send it to the indicated email. If you were following this guide, it will be similar to mine:
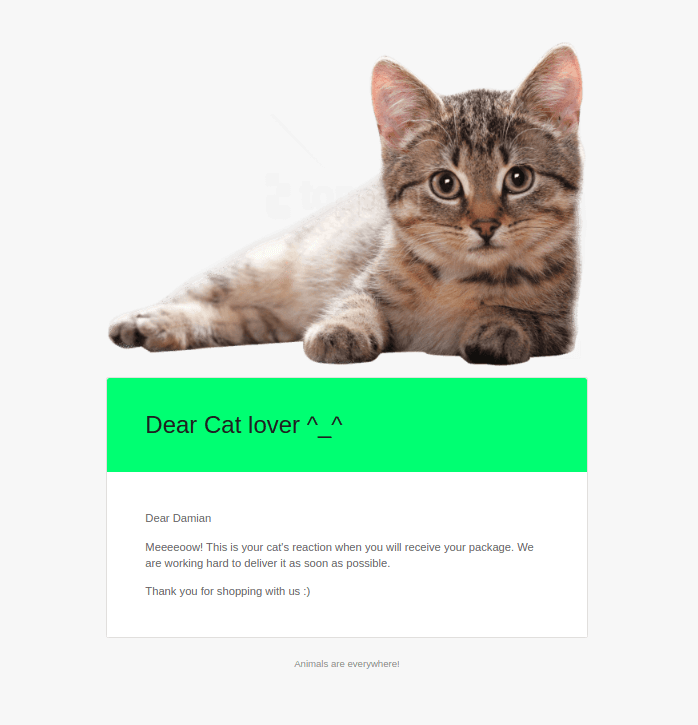
Now you know how to create and customize new emails in WooCommerce!
Additional options in ShopMagic PRO
Whether you are a ShopMagic PRO user or not, you may find this part useful as I’ll show you some benefits which come exclusively with our add-ons.
In this example, I’ll use ✅ Advanced Filters for better customer segmentation and ✅ Customer Coupons to create a small discount. Because who doesn’t like discounts? ShopMagic PRO contains all add-ons!
ShopMagic PRO £69
Not receiving WooCommerce new order emails? Go on and send WooCommerce new order emails to customers with ShopMagic.
Add to cart or View DetailsWooCommerce new order notification automation
This process is identical to the one described in the ⬆️ above section ⬆️, where we were creating email automation for the free version of ShopMagic. Describe the automation accordingly to your preferences and pick a New Order Event.
How to segment customers in WooCommerce?
Finally, using ShopMagic’s full potential 🙌.
Advanced Filters comes with lots of useful filters which you can use to segment your customers.
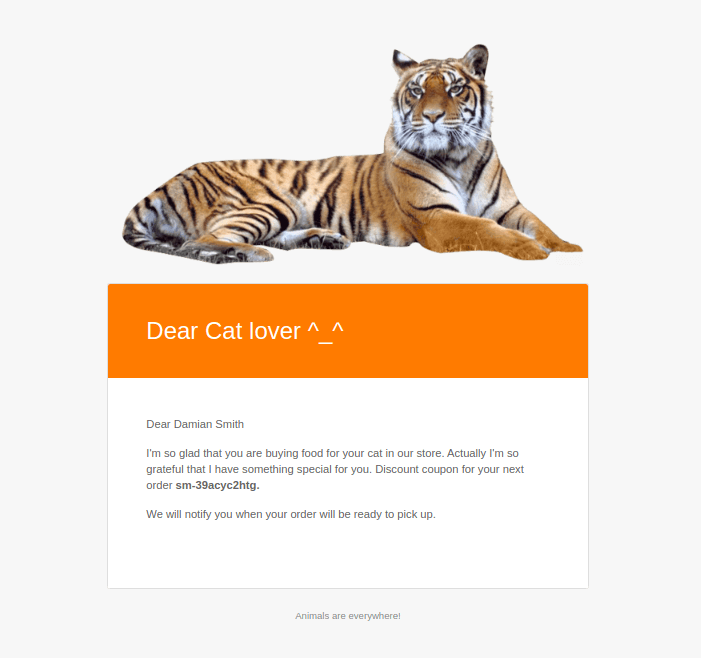
In our example, we will use Order - Item Categories and Order - Shipping Method filters. With such a segmentation, only customers who bought something from the “Cat” category and at the same time will pick a specific item from your store will receive this email.

Creating an action for the WooCommerce new order emails
The final step of every automation is to choose and create an Action. The whole process is similar to the free and PRO users with few differences.
Choose a type of action and place a description.
Fields To, Subject, and Heading are self-explanatory. Similarly to the above guide, we are using a standard WooCommerce template.
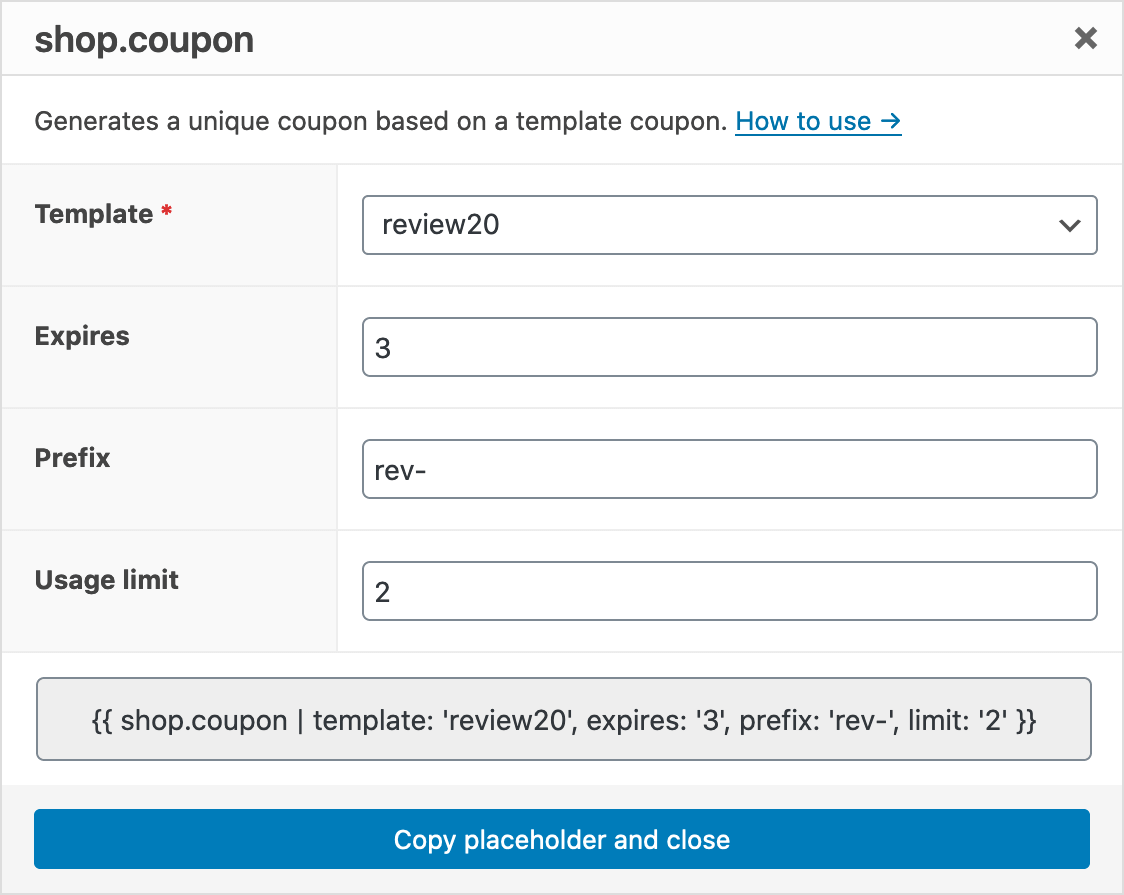
I mentioned earlier that besides Advanced Filters, we will use another add-on, Customers Coupon. Now is the time to do it 😎.
With this add-on, I created a personalized and unique coupon for every recipient of this email. The customer who will receive it will be able to use it for the next purchase, but it was my choice.
How to test and preview your WooCommerce new order email?
If a feature is part of the free version of ShopMagic, it’s definitely in the PRO version also 😇. You may simply test your email with the Send test feature. If you want to make some changes – feel free to do it until you will be fully satisfied with the result:
WooCommerce new order email video tutorial
Psst… You can also see the entire process of creating this automation in this video tutorial:
Although the layout of the plugin has changed beyond recognition since the video was created, maybe it will help you when creating your first WooCommerce new order notification 😀.
History & features of ShopMagic
In the beginning, ShopMagic was able to send fully automated emails to customers. Whether it was a WooCommerce new order email, order processing, or order completed, your customer would receive a proper email notification with properly configured automations.
Since then, we have implemented lots of features, which no longer qualify ShopMagic as only a marketing automation plugin. More like a multitask power machine for your WordPress and WooCommerce!
But let’s be honest – marketing automation sounds better 🤪.
Instead of pondering about the proper definition, take a look at a list of some features available in ShopMagic:
If you are looking for any other guides, check the guide category. We’ve covered all the WooCommerce order statuses, so I’m pretty sure that you will find something useful there. And if not, that’s not a problem. Write to us with a specified scenario that you want to create and our dedicated support team will gladly help you.
Why use ShopMagic?
If you wonder how to resolve these issues:
- WooCommerce is not sending the new order email notification
- Would you like to send the WooCommerce new order email also to the admin
- WooCommerce is not sending new order emails or customers tell you they are not receiving the new order email notifications
- Would you like to resend new order notification emails in WooCommerce when you want
- WooCommerce new order email is not received or worse, customers are not receiving all WooCommerce emails
- You want to modify the WooCommerce new order email template or other emails easily
- It would be great to have control over the WooCommerce new order email with some filters, choosing a time, or hook additional actions (save the order data to Google Sheets, send SMS notifications, encourage customers to buy again)
Then, ShopMagic is for you 😀!
Summary & more about ShopMagic
Today, you’ve learned how to create, customize, and send a better new order email notification in WooCommerce! I encourage you to download the free version and start right away.
ShopMagic
Not receiving WooCommerce new order emails? Go on and send WooCommerce new order emails to customers with ShopMagic.
Download for free or Go to WordPress.orgOf course, if you need more features or all add-ons choose ShopMagic PRO →
Finally, visit our blog to read more about email marketing automation for WordPress & WooCommerce.
Related to WooCommerce’s new order email
-
How to delay emails in WordPress

How to schedule your email. Find out how to use ShopMagic to delay your WooCommerce emails. It’s easy! -
WooCommerce transactional emails

Transactional emails in WooCommerce. Find out how to use ShopMagic to send WooCommerce transactional emails.