



What is an automation, and how is it built?#
An automation is a workflow that tells ShopMagic when to act, which conditions must be met, and what to do.
Each automation contains:
- One Event — the trigger that starts the workflow.
- One or more Actions — the tasks ShopMagic performs.
- Optional Filters — conditions that restrict when the actions run.
You can also use Placeholders in supported fields to insert dynamic information, such as a customer's name or an order number.
ShopMagic does not limit the number of automations you can create. This applies to both the free version and ShopMagic PRO.
Event#
The event defines when ShopMagic checks the automation. For example: “When an order is completed, check the filters and run the actions.”

Select an event from the dropdown. Examples include:
- New Order — responds to the creation of an order, regardless of its status.
- Order Pending — responds when an order is pending payment.
- Order Completed — responds when an order's status is set to Completed.
- Order Status Changed — responds to a status change, with optional source and destination statuses.
Events are not limited to order statuses. ShopMagic also provides events for customer accounts, posts, and products. Add-ons introduce events for forms, carts, memberships, subscriptions, and other integrations.
The selected event determines which data is available to filters, actions, and placeholders.
Rechecking the order status#
Some order events provide Recheck order status before run. Enable it to check that the order still has the required status before the action executes. This is useful when actions are queued or delayed.
For Order Status Changed, the recheck compares the current status with Status changes to. If that field is set to Any status, no specific current status is required.
Use Order Status Changed for custom order statuses registered with WooCommerce.
Filter#
Filters are optional conditions that determine whether the automation proceeds after its event occurs.
For example, Order - Items lets you check whether an order's products match the selected condition.
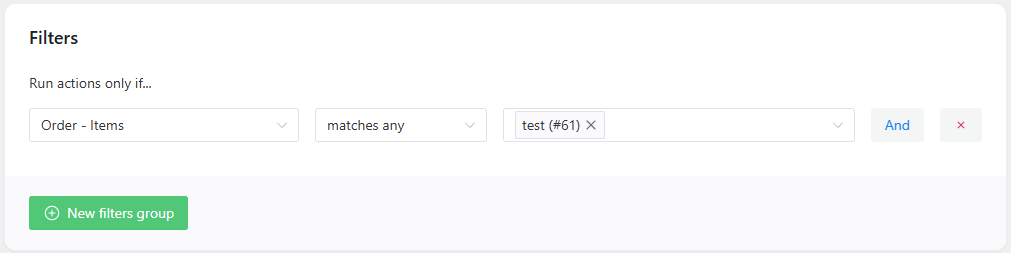
Without filters, the automation has no additional filtering restrictions. It still responds only to its selected event and remains subject to other execution conditions.
Use And to combine conditions within a group: every condition must pass. Use New filters group to add an alternative group: at least one complete group must pass.
Available filters depend on the event and active add-ons. Advanced Filters adds conditions such as customer spending, order dates, and payment or shipping methods.
Action#
An action defines what happens after the event occurs and the filters pass. An automation can contain several actions, each with its own settings.
For example, one automation can send an email to the customer and post an internal notification to Slack. Available actions depend on your active integrations.
Send Email fields#
The standard Send Email action provides the following fields:
- Description — an internal label for identifying the action. It is not part of the email.
- To — the recipient's email address. The default
{{ customer.email }}uses the customer supplied by the event. You can enter another address for staff notifications. - BCC — sends a hidden copy to the specified address.
- Subject — the email subject. Supports placeholders.
- Heading — the heading used by the WooCommerce email template. Supports placeholders.
- Template — choose WooCommerce Template or None. The WooCommerce template is available and selected by default when WooCommerce is active. None sends the formatted message without that surrounding template; it does not switch the email to plain text.
- Message — the email content. Use the editor to format text, insert images from the WordPress media library, and add placeholders.
- Unsubscribe link — adds a link to the customer's communication preferences in the message footer.
- PDF Attachments — attaches PDF files to the email.
Other action types have different fields. For example, Send Email - Plain Text sends text-only content, while Send Email - Raw HTML accepts your own HTML layout.
Placeholders#
Placeholders insert data when an action runs. For example, {{ customer.name }} displays the name from the customer data supplied by the event. That customer may be a registered user or a guest.
You can combine placeholders with regular text:
Hello {{ customer.first_name }},

Your order #{{ order.order_number }} is complete.
Choose placeholders supported by the selected event and configure any required parameters. An order placeholder needs order data; a customer-only event does not automatically provide the customer's latest order.
Learn more about placeholders →
Publishing and checking your automation#
Save the automation as a draft while configuring it, then publish it when ready. Publishing does not replay past events or automatically process existing orders.
By default, ShopMagic runs actions through a background queue, so execution may not be immediate. Check ShopMagic → Logs → Queue for pending actions and Outcomes for execution results.
Use Send test to check a supported email action. It sends a real test message but does not evaluate the automation's event or filters. Verify the complete workflow with a controlled event.
How to create your first automation#
Follow the guide to creating your first automation →