


This is a step-by-step guide on how to connect your WooCommerce store to Google Sheets for free, no matter how much data you send. Let’s export WooCommerce orders and WordPress data (forms, posts, comments) to Google Sheets with ShopMagic and its free Google Sheets integration. Let’s begin!
You don’t want to go through lengthy external integrations or flows, understand weird terminology, or create scripts, APIs, and webhooks to connect your WordPress or WooCommerce with Google Sheets, do you?🥱
➡️ Let’s use ShopMagic and the ShopMagic add-on for connecting to Google Sheets. It’s one of the simplest methods to link WordPress, WooCommerce, and Google spreadsheets.
ShopMagic
Customize emails, run email marketing, and connect WordPress and WooCommerce with Google Sheets.
Download for free or Go to WordPress.orgShopMagic can send WordPress & WooCommerce order data to Google Sheets.
Of course, you can send not only WooCommerce order data to Google Sheets but also connect the WordPress:
- blog posts URLs
- comments and product reviews
- emails, payment methods, user data
- entries from Contact Form 7 and Gravity Forms
- data from subscriptions, memberships, and bookings
Automatically, for a chosen event is or manually with the placeholders to get the data.
Read on to learn how to set up your WooCommerce and Google Sheets connection in EXACTLY 7 clicks (and one copy-paste).
Table of contents
- Connect your WordPress/ WooCommerce store to Google Sheets – benefits
- Google Sheets – a perfect tool for your eCommerce analysis?
- Google Sheets vs WooCommerce analytics
- Connect your WooCommerce store and Google Sheets – a checklist
- Export WooCommerce orders to Google Sheets in 3 steps
- Set up ShopMagic automation to send new order data to a Google spreadsheet
- Summary & more about ShopMagic
Take me straight to the guide 👇
WooCommerce to Google Sheets. The benefits.
Although Google Sheets is only a part of this package, it’s still an impressive number and places it as one of the most popular spreadsheet solutions.
👉🏾 Connecting your WordPress site or WooCommerce store with a Google Sheets spreadsheet will let you store your data in a tabular form that’s easy to read, process, and analyze. What else?
👉🏾 Google’s spreadsheet software is also well documented, so there’s a possibility that whatever you would like to achieve with your data, a solution is already out there.
What can you use Google Sheets for?
💡 Here are just a couple of ideas:
- customer segmentation and insights
- product sales analytics
- inventory management
- accounting
- sales forecasting
- connecting your data with other apps
- get the list of blog subscribers
- export blog posts after publishing with custom data
About WooCommerce and WordPress Google Sheets integration
➡️ A lot of tools that let you connect and send data between different systems (like WooCommerce and Sheets) base their pricing on the number of operations you perform monthly.
➡️ This means that if you’re not paying attention and exceed a certain amount of actions, your invoice can get 2-3x higher quickly!
This kind of pricing also punishes you for growing – the more actions you perform, the more you will pay.
Not fair, right?😤
✅ That’s why we created a solution to give you more flexibility and peace of mind, so you don’t have to nervously check your monthly usage and wonder if it will be enough to stay within budget😇.
Google Sheets – a perfect tool for your eCommerce analysis?
Google Sheets is free software that will help you make data-driven decisions easier. It provides all the basic functions that an eCommerce store needs to analyze and draw conclusions from its data.
While it’s certainly not as powerful as tools like Power BI or Tableau, it lets you easily perform both general and more advanced operations like RFM analysis and segmentation.
✅ Here’s why you should consider moving your WordPress or WooCommerce data to Google Sheets:
- No interface restrictions – freely sort, filter, modify and move your data around cells.
- A lot of built-in visualization options (charts).
- Functions that will help you with your calculations.
- Online, shareable access with just a link.
- Several support options, including the official Google Docs support forum and online communities.
- You can export and download your data using 6 different file formats.
- Easy integration with Google Data Studio if you ever need a full-blown custom dashboard.
- Access to advanced options like add-ons and scripts.
- Ready-to-use apps, extensions, and integrations from the official Google Workspace Marketplace.
Although Google Sheets is a great solution, you may wonder why it would be better than the analytics module you already have available in your WooCommerce dashboard.
Let’s find out!🙂
Google Sheets vs WooCommerce analytics
👉🏾WooCommerce’s built-in analytics module shares the same fate as some of the other tools provided natively (another example: WooCommerce emails).
It’s there and it’s working, right😎? It’s enough so you don’t have to worry about it from day one.
But it might not be enough if you need anything more than a simple periodic check-up.
Some of the WooCommerce analytics’ disadvantages😡
- Limited filtering options.
- The clunky appearance makes the analysis harder.
- You can’t reorder any of the items.
- It’s made purely for data viewing, not calculations or modifications.
- No ability to create custom reports.
- Manual data export only supports CSV files.
➡️ Feeling good about Google Sheets yet? Great, now let’s head below and see how to put your data into it.
Connect your WooCommerce store with Google Sheets
I will skip the obvious part here. Many guides waste your time by including the whole process of creating a new WooCommerce store – that’s NOT what we’re going to do here😵💫.

WordPress to Google Sheets integration
You can use the below method and steps ⤵️⤵️⤵️ to send data from WordPress to a Google Sheet spreadsheet automatically. It’s useful, for example, to automate saving your blog posts, users, or subscribers’ data in your Google Sheets.
But, since you’re already looking for a way to send your eCommerce data to a Google document, then probably you already have a functioning WooCommerce store. So, I will focus on sending data to Google Sheets from WooCommerce.
What will you need – checklist ✅
Let’s not make it longer than it should be🙂. Here are the 4 things you will need to make a WordPress or WooCommerce <-> Google Sheets integration work.
-
A Google account
First, you need it to access Google Sheets and other Google apps.
-
Google spreadsheet that will receive your data
Create a spreadsheet where you will store your WooCommerce figures.
-
ShopMagic for WooCommerce core plugin
Next, you will need a ShopMagic free plugin to manage your emails, marketing, and follow-ups in WooCommerce.
Go to the official WordPress plugins directory and download ShopMagic. You may also install it directly from your WordPress dashboard.
-
Get ShopMagic for Google Sheets add-on plugin
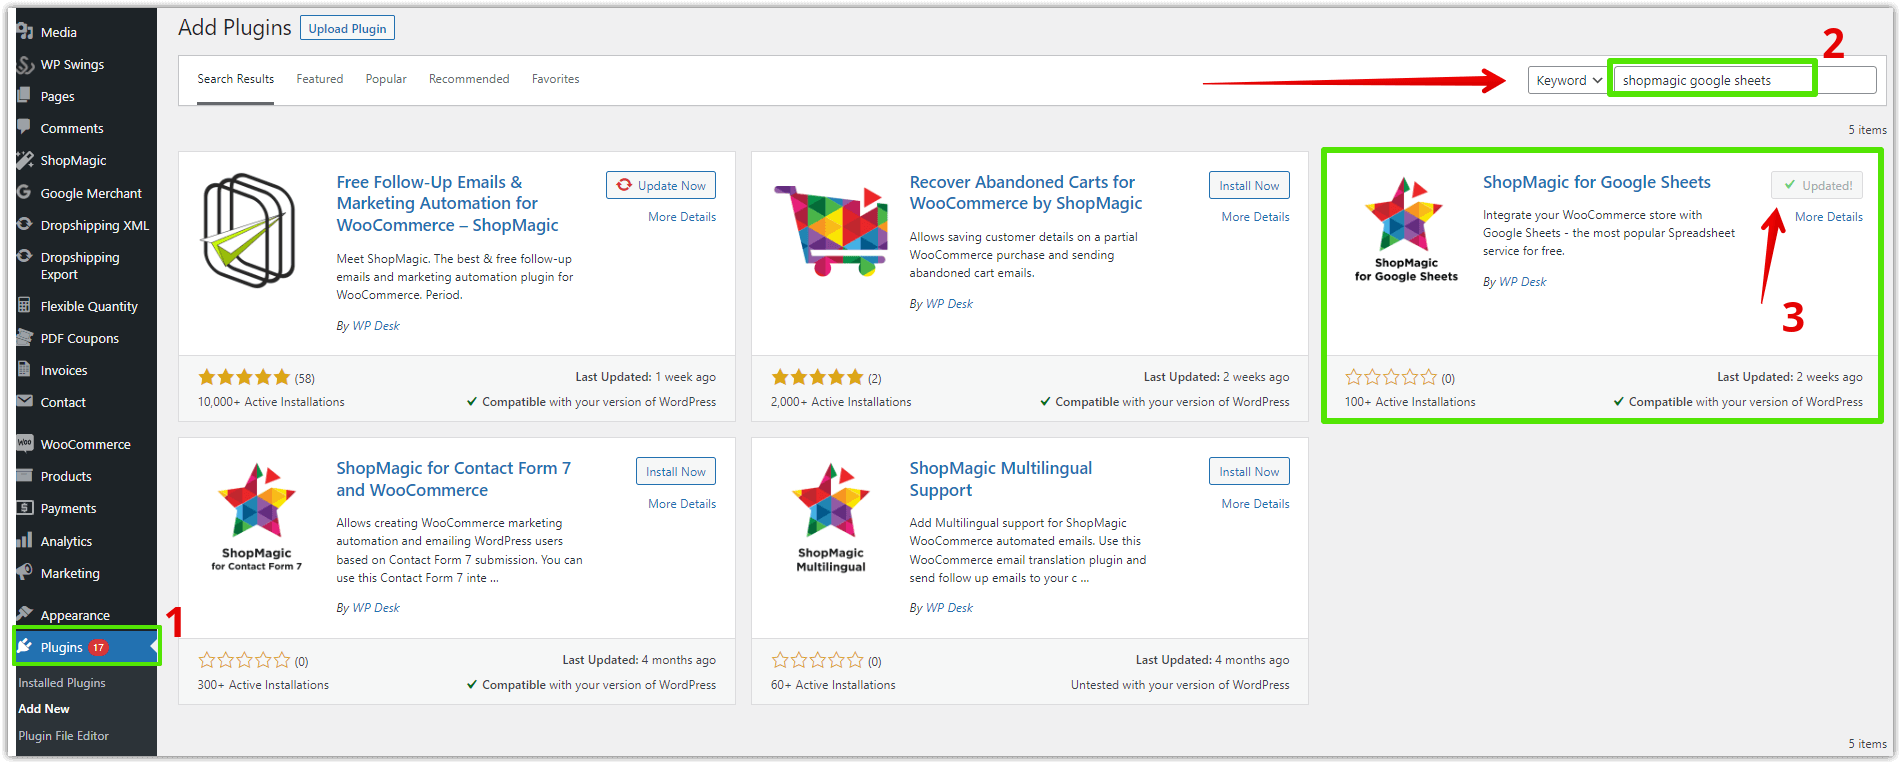
Just like the core ShopMagic plugin, the Google Sheets add-on can be found in the WordPress repository. You can find it also directly from Plugins → Add new menu in your WordPress dashboard.
That’s it! Now let’s move to the step-by-step integration guide.
Export WooCommerce orders to Google Sheets
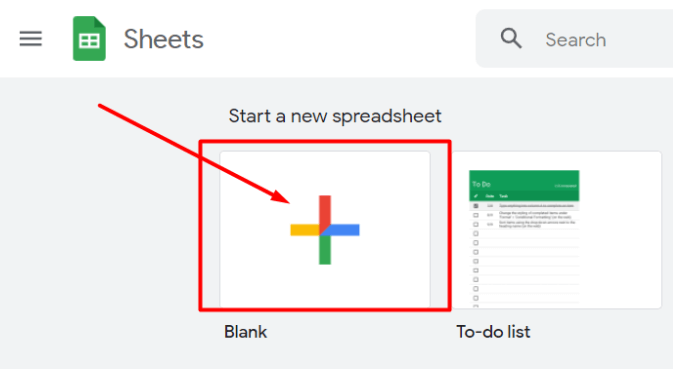
Step 1: Create a new Google spreadsheet
First, open your Google Sheets and create a spreadsheet that will receive your order data.
Go to the Sheets app right here and click the big plus icon.
✅You may include the following columns:
- Order ID
- Date
- Total
- Customer email
- Customer name
- Customer phone
- City
- Shipping method
- Products ordered
- See order link
Step 2: Install the ShopMagic plugin for WooCommerce
✅ After you have prepared the spreadsheet, it’s time to get the free ShopMagic plugins.
First, you will need to install the ShopMagic core plugin
It’s a plugin that will provide the whole interface to create an automation that will pass your desired WooCommerce data to Google Sheets.
Then, download the integration for Google Sheets
Now, get the add-on that is responsible exclusively for setting up the connection between your WooCommerce store, Shopmagic, and Google Sheets.
Step 3: Connect your WooCommerce store and Google Sheets
Once you have your spreadsheet and plugins in place, it’s time we set up the actual integration with 7 clicks – just like I promised at the beginning of this article.
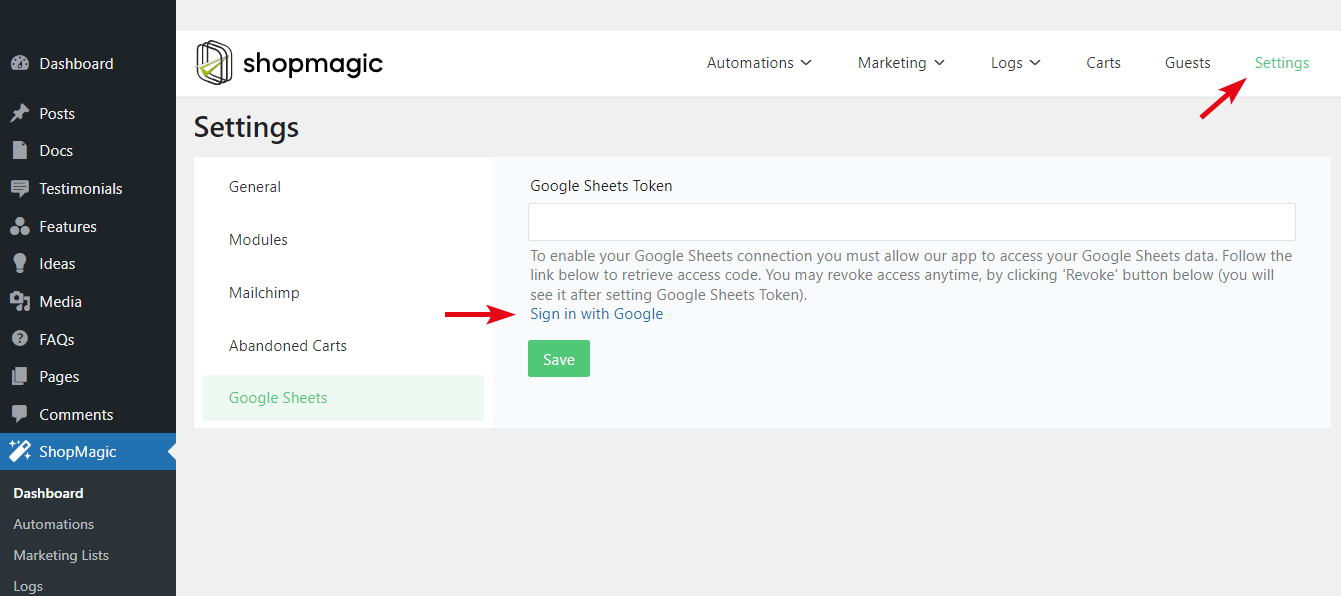
Click 1.
Go to ShopMagic → Settings → Google Sheets tab. Here you will find an empty field labeled “Google Sheets Token”.
To get your token (it’s really simple and will require only copy-pasting) and authorize data exchange between WooCommerce and Google Sheets, click on the “Get Google Sheets token” link.
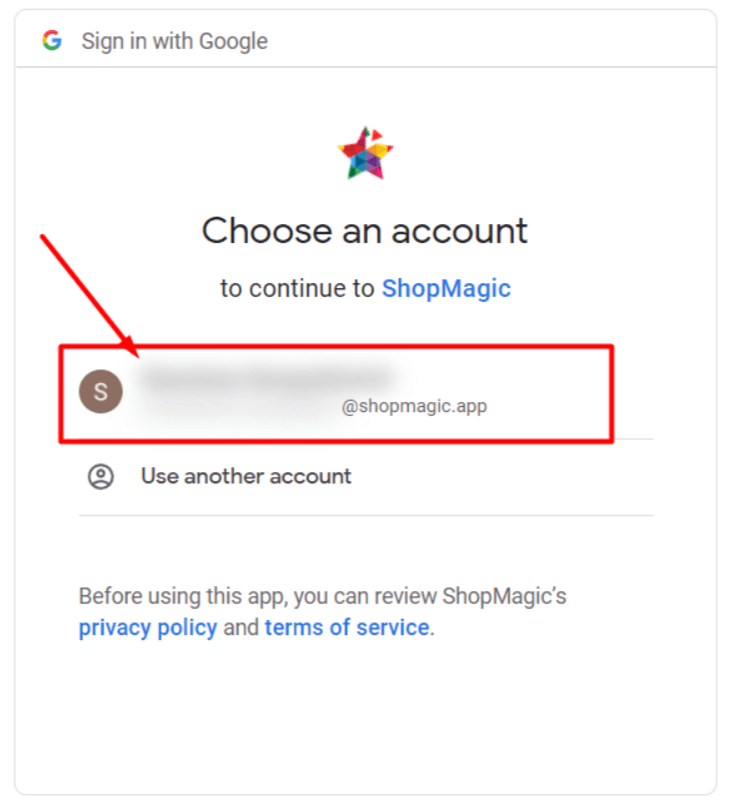
Click 2.
After clicking the link, a new browser tab will open. Please choose a Google account that you would like to connect with your WooCommerce store.
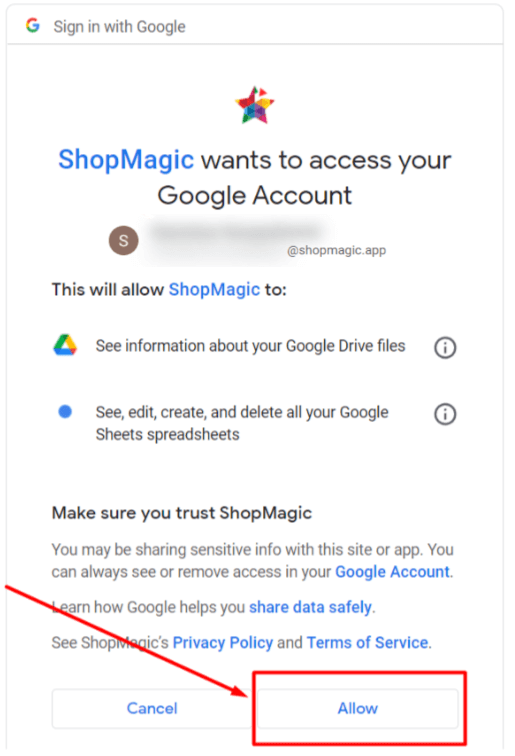
Click 3.
Now, click on “Allow” to proceed. In this step, you will be asked to allow ShopMagic to do two things:
- See information about your Google Drive files – spreadsheets are saved there, and ShopMagic will not read any other files you have stored on your G Drive.
- See, edit, create, and delete your Google spreadsheets – no, ShopMagic will not create or delete your spreadsheets. That’s just Google’s way of naming the permission level we need to make the integration work.
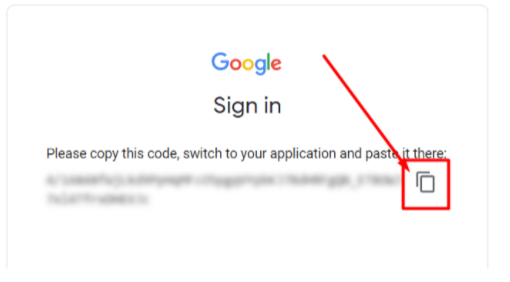
Click 4.
Now the token will appear – please copy it by clicking on the icon next to it (or highlighting it and pressing Ctrl+C/Cmd+C).
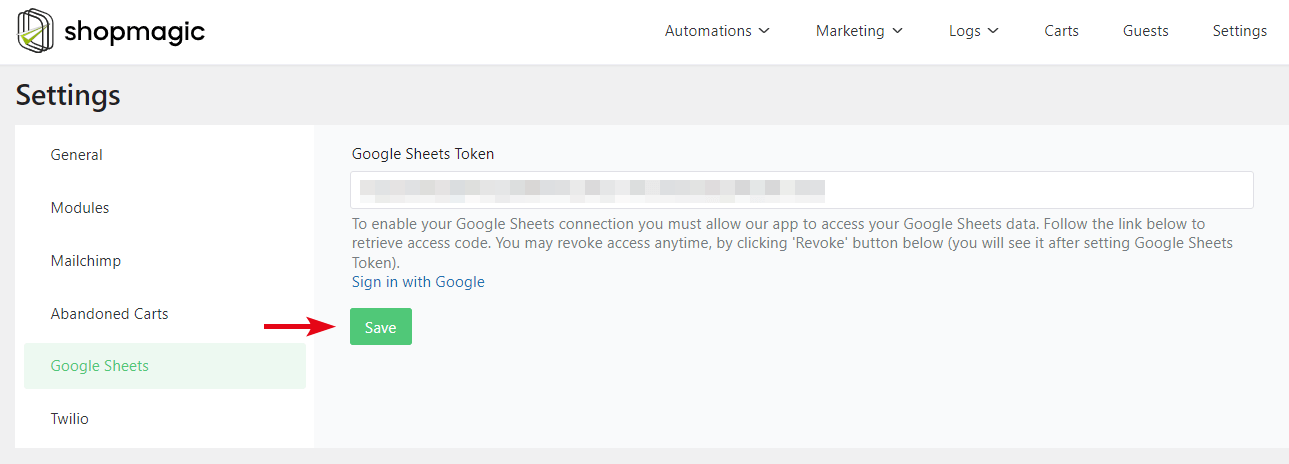
Click 5, 6, & 7.
Finally, go back to the tab where you have your ShopMagic settings opened and paste the token. Click on the “Save changes” button.
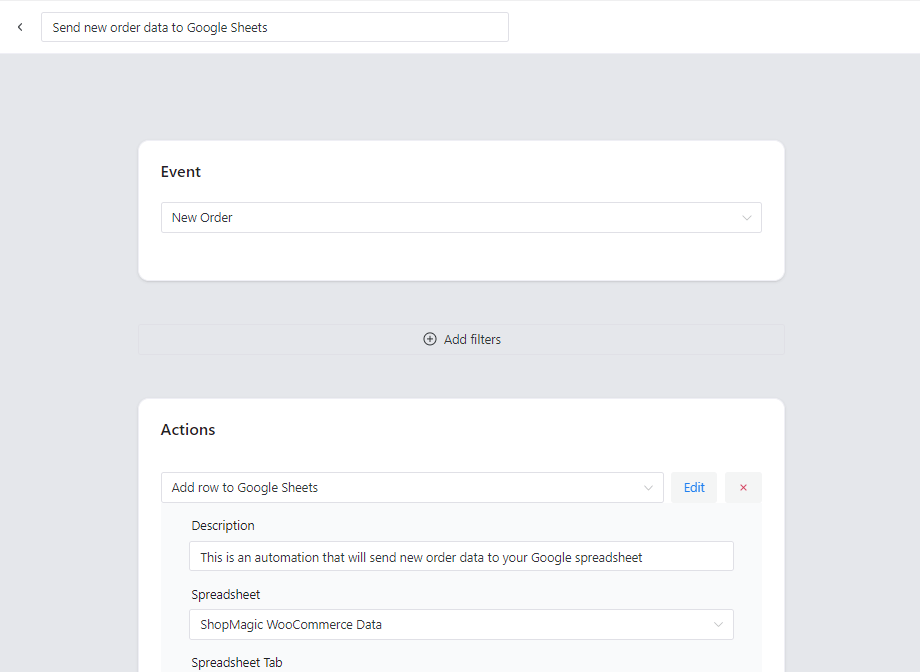
Set up an automation to send new order data to a Google spreadsheet
Now it’s time to create a process that will fill your Google spreadsheet with eCommerce data.
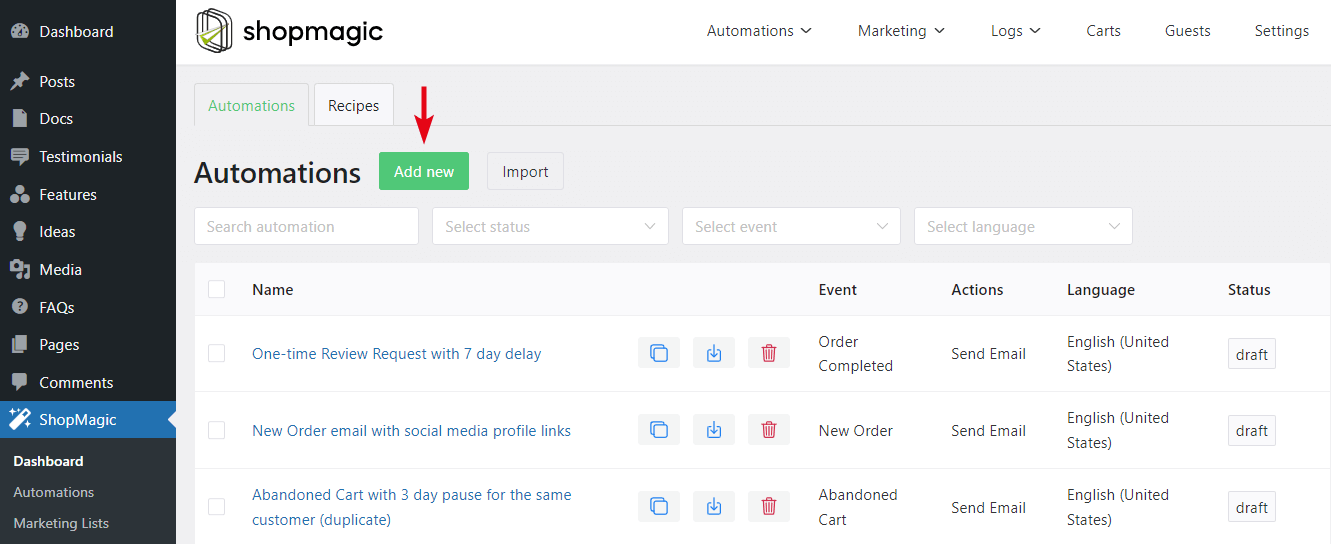
1. Add new automation
From your WordPress menu, choose ShopMagic -> Add new. This will create a new automation
Next, you can choose the ShopMagic action to send WooCommerce order data to Google Sheets.
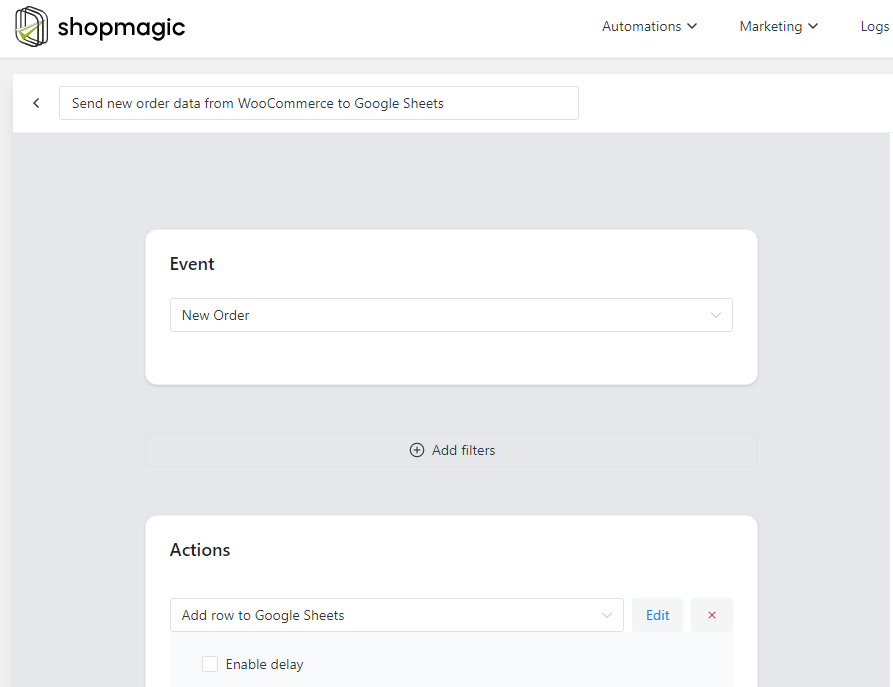
2. Export data to Google Sheets
Now, apply the following settings to your automation to automatically set the first row as column names):
- Event: New order
- Actions: Add row to Google Sheet
- Spreadsheet: here you will see a list of all your Google spreadsheets – please choose the one which should be populated with your order data
- Spreadsheet tab: choose a specific tab
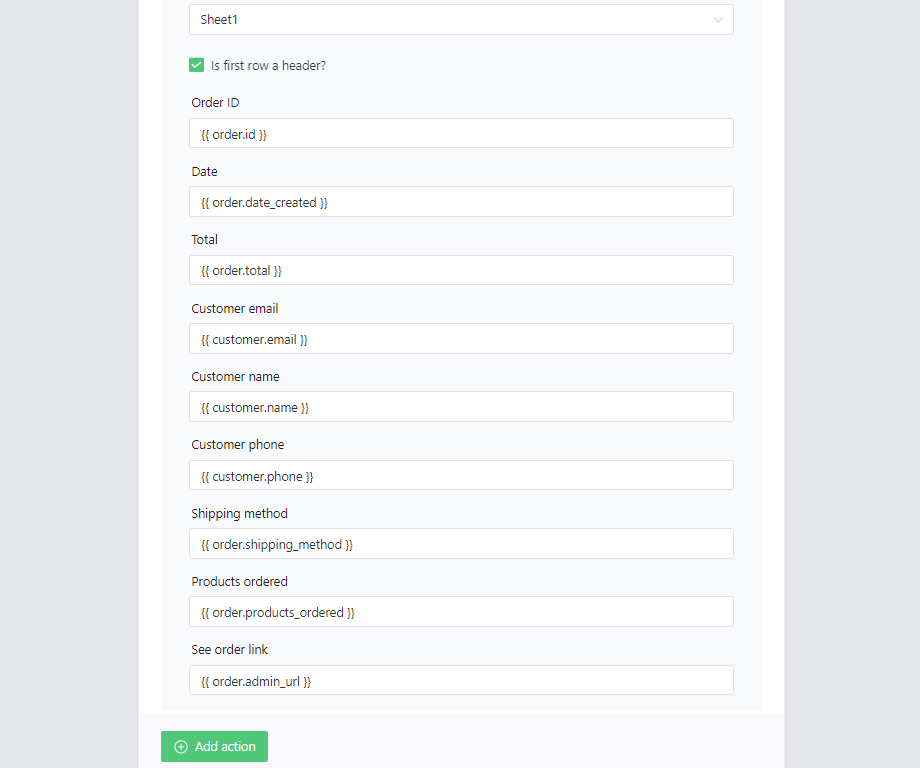
- Is first row a header?: click “checked” if the first row of your spreadsheet contains the column name
- Order ID: use the
{{ order.id }}placeholder - Date: use the
{{ order.date_created }}placeholder - Total: use the
{{ order.total }}placeholder - Customer email: use the
{{ customer.email }}placeholder - Customer name: use the
{{ customer.name }}placeholder - Customer phone: use the
{{ customer.phone }}placeholder - City: use the
{{ order.shipping_city }}placeholder - Shipping method: use the
{{ order.shipping_method }}placeholder - Products ordered: use the
{{ order.products_ordered }}placeholder - See order link: use the
{{{ order.admin_url }}{ placeholder
3. Click the “Publish” button

Congratulations! You have successfully set up your integration. From now on, every new order placed in your store will trigger an automation that adds a new row to your Google spreadsheet, populating its cells with your order’s data.
WordPress & WooCommerce to Google Sheets integration with a free plugin – summary
Today, you’ve learned how to send data from WordPress to Google and export WooCommerce orders to Google Sheets (spreadsheet). I hope you find useful applications of our WordPress/ WooCommerce free integration to Google Sheets.
1️⃣ Download the free plugin to integrate WordPress with Google Sheets.
2️⃣ Then, use a free add-on and export WooCommerce orders to Google Sheets →
Finally, read the blog for more use cases. And, of course, if you have any questions write to us!
More about this WooCommerce to Google Sheets plugin
-
WooCommerce Order Failed Email

WooCommerce Order Failed Email. ShopMagic not only is responsible for WordPress Google Sheets integration but also lets you create follow-up emails. -
WooCommerce Order Cancelled Email

WooCommerce Order Cancelled Email. In this article we give you tips on how to send WooCommerce Order Cancelled Email with Shopmagic.